Managing multiple configuration files across different environments can be challenging, and several tools are trying to solve this problem with different approaches. However, in this article, we'll learn how to use node-config to create and manage Node.js configuration files across different deployment environments.
Prerequisites
- Node.js 10.x
- Basic knowledge of Node
What is node-config?
Node-config allows you to create configuration files in your Node application for different deployment environments. With it, you can define a default configuration file that you intend to repeat across environments, then extend the default config to other environments, such as development, staging, etc.
You can override the parameters using some temporary command line parameters, such as adding NODE_ENV=development to your command line argument.
Node-config makes it easier to create and manage a consistent configuration interface shared among all of your deployment environments.
To better understand how to set up this configuration, let's use a sample Node application. First, run the command below on your terminal to clone this repository, or download it from here and unzip it.
bash git clone https://github.com/ezesundayeze/node-env-sample
To install the Node dependencies, run:
bash npm install
Or:
bash yarn
Setting up node-config
Because node-config is an npm package, we can install it with npm or yarn by running either of these commands.
bash npm install config
Or:
bash yarn add config
Supported node-config file extensions
Node-config supports many file extensions. At the time of publication, the current version of node-config (3.3.6) supports the following extensions:
- .json - .json5 - .hjson - .yaml or .yml - .coffee - .js - .cson - .properties - .toml - .ts - .xml
This means you can create your configuration files with any of the supported extensions, but it makes sense to choose one for your project and stick to it throughout your build.
We'll use the .json extension in this tutorial.
Creating default environment variables
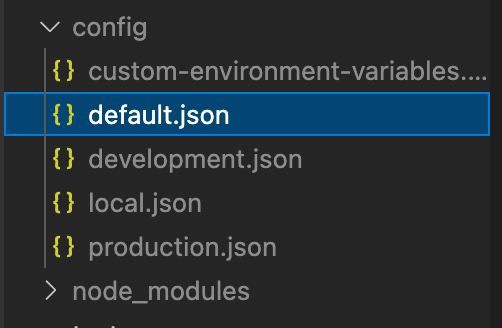
Create a config directory and add a config/default.json file to it. This will be the default config file and will contain all your default environment variables.
It should look like this in our sample app:
config/default.json
json { "server": { "host": "localhost", "port": 0, } } We'll access it in our app by importing config and using the get method to access the variables.
js const config = require('config'); const port = config.get('server.port'); const host = config.get('server.host'); Let's create a server.js file and add the code below.
js const express = require('express'); const config = require('config'); const app = express(); const port = config.get('server.port'); const host = config.get('server.host'); app.get('/', (req, res) => { res.send('Hello World'); }); const server = app.listen(port, host, (err) => { if (err) { console.log(err); process.exit(1); } console.log(`Server is running on ${host}:${server.address().port}`); }); You can use node-config in other parts of your application in a similar way.
Extending the default config file
You can extend the default config file by creating other configuration files. For example, you can create configuration files for development, production, QA, staging, local, etc. Let's cover the primary types of config files we'll be using in our app.
Local config files
Local config files are created to override the deployed version of your config files. For example, for your development deployment, you can have a local-development.json file that stores all of your local development configurations — something that mirrors the kind of behavior you expect in your deployed development environment.
So, you can have something like this:
local-{instance}.EXT local-{deployment}.EXT local-{deployment}-{instance}.EXT Short and full hostnames
You can also use short and full hostnames to define your config files on specific platforms in case you are going to deploy on multiple instances. For example, you can have a {short_hostname}, which will represent your server name up to the first dot. If your hostname is demo.example.com, the config can be demo.EXT (demo.json).
Also, if your {full_hostname} is your entire server name, you can use it when your {short_hostname} collides with other machines. So, in the case where your hostname is demo.example.com, your config file name will be demo.example.com.json.
Custom configuration files
You might also want to create a custom configuration file to house some environment variable overrides. Node-config provides support for the config file type that you can define with the name custom-environment-variables.EXT (custom-environment-variables.json).
Testing for config values
If your environment variables are not set, the services that use them will break. So, you should ensure your environment variables are tested. Node-config provides multiple utilities, one of which is the config.has() method that allows you to verify that environment variables are set.
You can create a test file or add it to your pre-commit hook to ensure you have your configuration files all set up.
Here is an example of how you can use the config.has() to check that a config variable exists:
js if (config.has('dbConfig')) { ... } You can also use it in your Jest test, like this:
js const config = require('config'); test('Server config exist', () => { expect(config.has("server")).toBe(true); }); test('Default config exist', () => { expect(config.has("server.port")).toBe(true); expect(config.has("server.host")).toBe(true); }); Using command line override
Using command line override allows you to specify the configuration parameters on the fly from your terminal or command line. You'll need to set the configuration by specifying the NODE_CONFIG='{...}' command when starting the application. The parameters must be in a JSON string format.
Here is an example:
bash NODE_CONFIG='{"server": {"host":"192.168.43.13", "port":"3030"}}' npm run dev 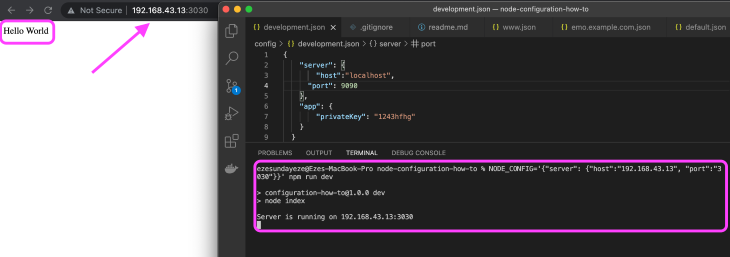
The single quotation marks around the JSON value allow you to use the double quotation marks safely. On some occasions, depending on your operating system, you might need to escape some characters. You can also use the command line export to avoid typing the command all the time.
Running the command below on your terminal will override the host and port of your server or any other configuration you choose to override.
bash export NODE_CONFIG='{"server": {"host":"192.168.43.13", "port":"3030"}}' If you prefer to use JavaScript, you can add it to your server file before calling the configuration library, as shown below:
js const express = require('express'); process.env.NODE_CONFIG = '{"server": {"host":"localhost", "port":"3030"}}'; const config = require('config'); The trick is to set the NODE_CONFIG variable to a JSON string before config loads.
This happens because the command line override takes precedence over all other types of overrides. Below are some reserved words you cannot use as environment variables when using node-config, as the library offers implementations of them that might collide with yours.
get has util getConfigSources makeHidden makeImmutable setModuleDefaults watch _attachProtoDeep _cloneDeep _diffDeep
This is not an exhaustive list, so be sure to check out the docs.
There are a few plugins that allow you to efficiently use node-config with Docker to manage secrets, a plugin that allows you to reload node-config automatically (as you may already know, configurations are not automatically loaded on file change), and a plugin that allows you to uncache your config variables.
Conclusion
There are endless ways to configure your Node app when using node-config. With it, you can easily manage your config files and extend them as you desire, allowing for maximum flexibility, reliability, and consistency within your project. Thanks for reading.


No comments:
Post a Comment
Note: Only a member of this blog may post a comment.