[New post] Recording Reaction & Tutorial Videos With Streamlabs OBS
Dwayne posted: " When it comes to reaction & tutorial videos and even streaming, there are numerous software applications you can use. Today, we are going to learn how you can record videos (and efficiently stream) using Streamlabs OBS. Streamlabs OBS is synonymou"
When it comes to reaction & tutorial videos and even streaming, there are numerous software applications you can use. Today, we are going to learn how you can record videos (and efficiently stream) using Streamlabs OBS.
Streamlabs OBS is synonymous with streaming live video, but many forget that it is a very capable application that can also record video as well. A lot of these tips will extend to better recordings and streams with Streamlabs OBS as well, not just specifically for recording videos.
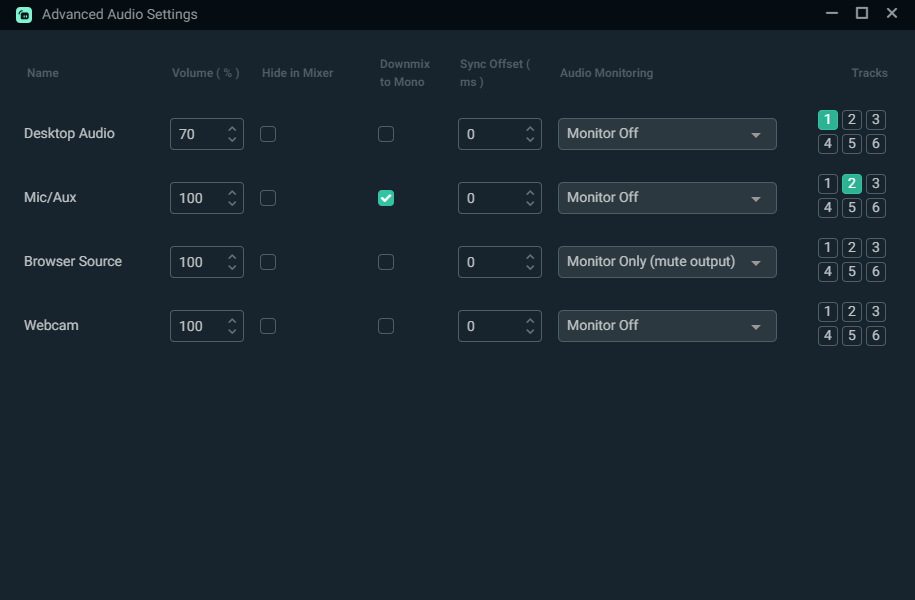
Audio sources onto separate tracks
During the post-production, one thing you'll find yourself doing is adjusting audio levels. By default, all audio is squished into one single audio track. While this makes sense for streaming because most streaming platforms don't support multi-track audio, for recording you want separate audio tracks.
In my case, I have a microphone and I am also recording the desktop audio. When a video or song is playing, I want that audio on one track, when I talk over it, I want that on a separate track.
To the right-hand side where it says, "Mixer" look for a cog icon in the top right which opens up advanced audio settings. Notice that I have 4 audio sources, but only two of them are assigned.
Desktop audio is track one and that is anything that plays on my computer. Mic/aux is my microphone and that is assigned to track two.
If you were to record using these settings and then open up the recorded video file in Adobe Premiere Pro, this is what you would see in the timeline.
Notice how there are two audio tracks? A1 is the desktop audio aka track one and A2 is the microphone aka track two. You can now easily adjust volume levels on individual tracks. This alone will level up your recording and editing capabilities. From an editing perspective, separate audio tracks are a gamechanger to your editing workflow.
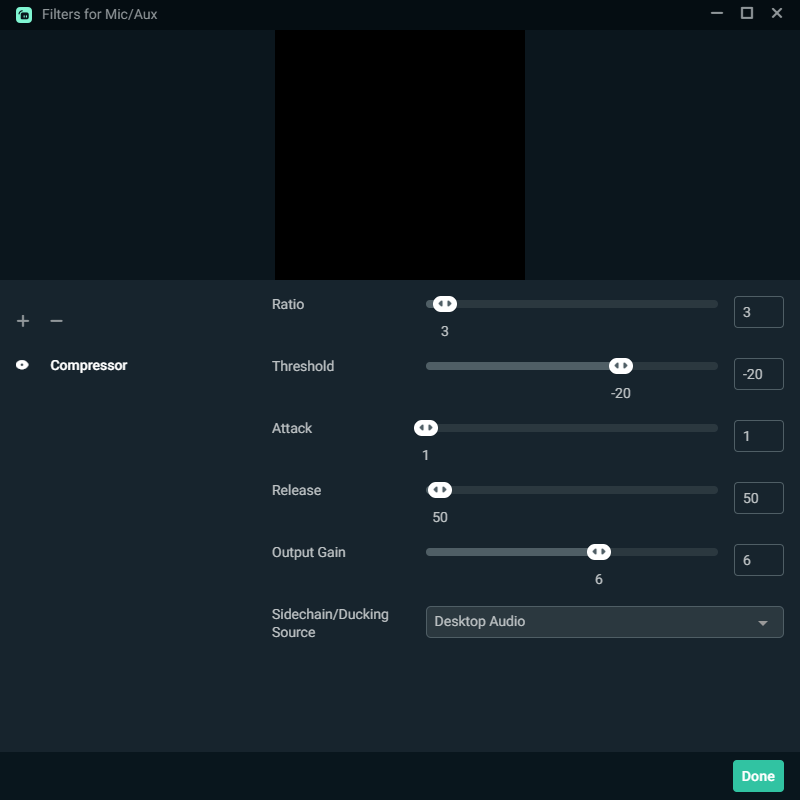
Use a compressor
Depending on what type of microphone you have, you might run into issues where at times your microphone is too loud and distorts. Sometimes that is the desired effect, but if you want professional sounding audio, you want a compressor.
In Streamlabs OBS, it comes with quite a few audio filters and one of those is an effective compressor. By setting a few variables, you can prevent your audio from going into the red if you yell or scream. It will prevent your audio from going into the red and sounding unpleasant.
For this, the settings will be quite dependent on your microphone (USB or XLR) and any audio interface. Here are my settings.
The ratio is set to 3. The threshold is set to -20. The attack is set to 1. We set the release to a super low value of 50.
The one setting you will want to experiment with is the gain value. Compressing audio will lower the volume and you'll need to boost it slightly. You want on the monitoring level when you speak for the audio to sit in the yellow band, not right in the middle, but a little before it.
Try speaking and yelling into your microphone to see where the level indicator goes and adjust accordingly. For me, I needed to turn the gain up to 6 for a good boosted sound that doesn't put me into the red, you might need more or less.
You might notice at the bottom we have a sidechain/ducking source and it's set to Desktop Audio. The reason for this is when I speak, it will turn the volume down of the desktop audio source. You might not want this, but it just means that you're not fighting other audio when you talk, it quietens it down a little bit.
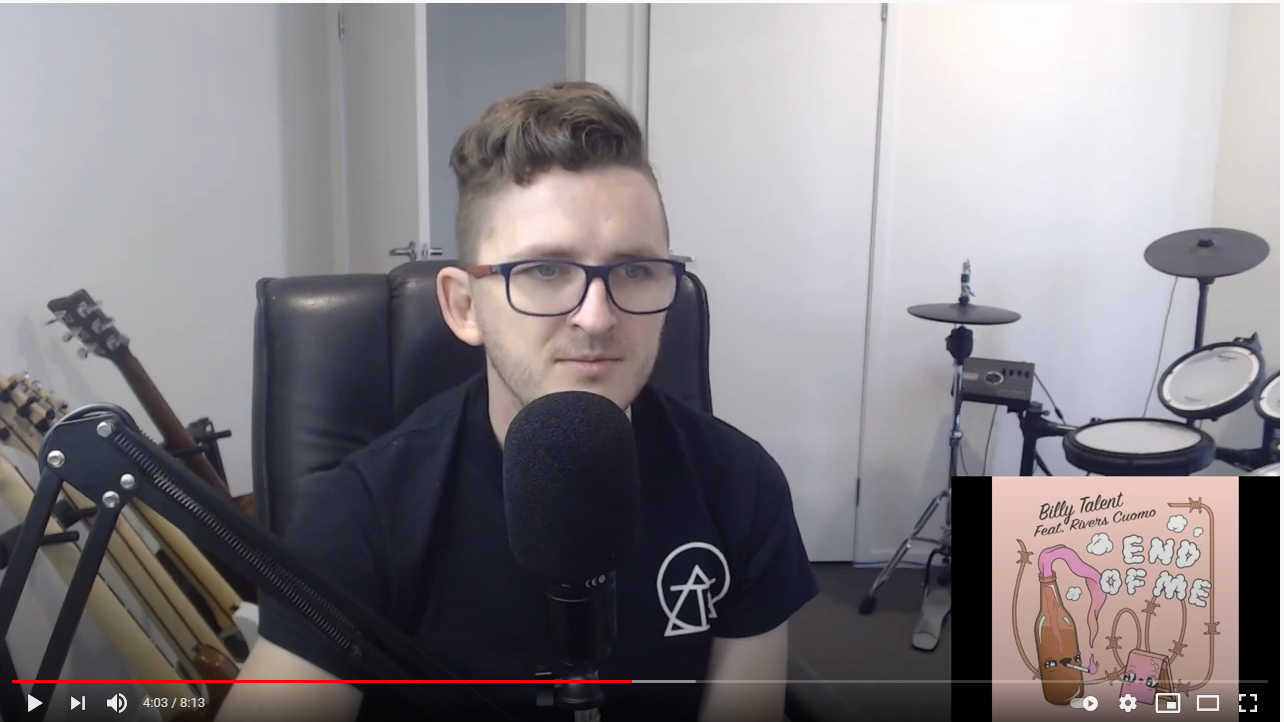
Only Have One Monitor? Use Browser Source
You've probably wondered how YouTuber's and Twitch streamers get a small little box that they use to show websites or YouTube videos. This can be achieved using a Browser Source. This is the perfect method for those of you who only have one monitor, where full-screening a video and also being able to monitor your Streamlabs OBS settings is not possible.
The downside is that if you have YouTube Premium, you'll need to log in to it first if you're showing YouTube videos and don't want to be bothered by ads. You can interact with the browser source by right-clicking on the box and then selecting, "Interact" — the URL goes into the source field, right-clicking and selecting "Properties" will provide the field to put in the URL.
What you get is this beautiful browser source that can be resized and moved into whatever position you want it to be. This is what the end result can look like.
As a rule of thumb, if you are looking at your screen and to your left, put the box in the right-hand corner of Streamlabs OBS. Because everything is flipped like a mirror effect, it's the opposite (so looking left records as looking right).
Have Two (or more) Monitors? Use Display Capture
If you have two or more monitors, display capture is the perfect way to capture either a whole screen or a specific application. Your left screen becomes the browser source that you capture, allowing you to full-screen and whatnot. Your right screen is where your Streamlabs OBS app lives, it will show you your levels and allow you to change scenes, etc.
The premise is the same, except you choose Display Capture and then select the appropriate mode. For a multi-display setup, capturing the entire desktop itself is probably the best course of action.


No comments:
Post a Comment
Note: Only a member of this blog may post a comment.