Not only are Google Workspaces, Google Sheets, Docs, Forms and Slide great to work in and look awesome, but the convenience of collaborating and sharing your Google Drive Files and Folders is also super useful. So much so that many course creators share their documents with their students all the time.
The problem that course creators have is that they are generally stuck with two options when sharing their Google Drive files and folders:
- Set sharing to Anyone with Link can view. And hope other freeloading students don't find and share their course material.
- Manually share each student as they enrol. Which is time-consuming for the course creator and annoying for the student who needs to wait to be shared before they can get their hands on your awesome course content.
Both options are really terrible.
I reluctantly chose option one for my first Google Sheets Essentials Teachable Course and it really bothered me. I needed to find a way to share my Google Drive course content with only those students who signed up for my course.
In this tutorial, I will guide you through creating a Google Apps Script web app that receives a webhook notification when a student enrols onto one of my Teachable courses. If a student enrolled with a non-Gmail or non-Google Workspace domain email account, they will be sent an email with an attached form to add a Google-friendly email.
If you want a copy of the Google Sheet with the Apps Script attached, without coding it all yourself, plus written-visual tutorials on how to quickly set up your sheet head over to my teachable page now and purchase the sheet and instructions for just $2.95. Yeap not even the price of a cuppa.
The fun thing is that you will experience how the whole process works, because...well...that's how I am going to share the Google Sheets file with you when you enrol. Neat, hey?
As a part of your purchase you will also get a few other perks:
- Set files or folders for 'view', 'comment' or 'edit' access.
- Add existing students to your selected course Google Drive Files and Folders.
- Get your full course list from your Teachable site right in your Sheet.
- A choice to bulk set your files and folders to:
- prevent downloads, copying and print.
- Prevent sharing by any documents you have provided 'edit' permission to.
If you want to understand how it all works and build your own, read on, you can always throw a couple of coins at me and enrol to run the workflow just for fun.
Instantly share ONLY Teach:able Students to selected Google Drive Files and Folders

If you are looking to build your own Teachable Course you can check out a how-to guide here:
How to launch an online course—and craft your email strategy
How it all works
We will be making use of Teachable's handy webhooks to receive instances when a student enrols on one of our chosen courses.
We will need to set up a Google Sheet that contains two Sheet Tabs. One for our list of shared files and folders by course and one with our list of registered students.
We will also need to create a way to send a message to any student who has not registered to our Teachable school with a Gmail or Google Workspace domain email and ask them to provide a Google-friendly email. Once they reply we need to automatically share them with their new email.
Let's Get started.
Creating your Google Sheet Manager
First, we need to create a Google sheet manager to make it easy for us to:
- Add files and folders that we want to share with our selected courses.
- Keep a record of our shared students by course.
- Receive and manage form responses from students who need to provide a Google-friendly email.
Go ahead and create a new Google Sheet.
Setting up your Google Sheet
Name your Google Sheet workbook whatever you want. I've named mine:
Share Teachable Students to Google Drive Elements
Store File and Folder Locations
Rename 'Sheet1' to 'Shared Locations'.
In row 1 enter the following Headers:
- Course Name
- Course ID
- File/Folder Name File
- Folder URL

Get the course ID for your Teachable Course
First, head over to your Teachable school. Log in and then select a course.
Navigate to your School Course page and select a course.

When the course loads, take a look at the URL, you will see the numerical code.

Select and copy it.
Head back to your Google Sheet Manager and select the 'Shared Locations' Google Sheets tab.
Now paste it into Column B and then update the title in Column A.
Next, add a name for your File or Folder in Column C. You add what you want here or leave blank if you are feeling lazy. Sometimes it is better to rename the file or folder so that it makes better sense in the context of this list. If you do this, your original file or folder will not change.
Finally, copy and paste in your URL for your file and folder in Column D. Here, you can either navigate to your Google Drive file or folder and copy and paste in the URL. Alternatively, right-click on the file > select Get link > Copy > Done. Then paste in your URL.
Rinse and repeat.
Your 'Shared Locations' Google Sheets tab should look like this:
 The most important stuff here is Column B and Column D. We will use this in our Google Apps Script.
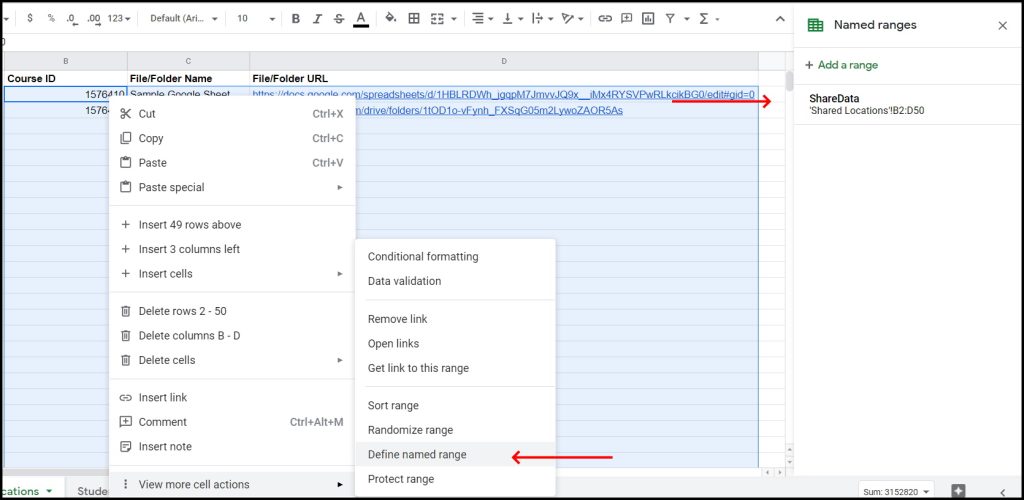
Create a named range
Next, selected the range A2:B50 > right-click > View more cell actions > Define named range. Then name the range 'ShareData'.
Click to Expand!
We will also use this in our code later.
Store Enrolled students details and Tokens
Create a new Google Sheets tab and call it, 'Students'.
Next, in cell D1 add the header: For non-Google Accounts.
On row two add from Column A2:
- Timestamp
- Email
- Course
- Non-Google Email
- Access Token
- Token Submit Date

Click to expand!
You can see in the image above how a student's details is added. This is all done via our Google Apps Script.
In the example above we have a student who did not register with a Google-friendly email so we send an email with our form and our Access Token for them to reply with a Google-friendly email. This is all updated automatically.
Now it's time to crack on with the fun stuff, the code. Go to Extensions > Apps Script. You will load your Google Sheet connected Apps Script Editor.
Rename the project. Generally, I rename it to the same name as the Google Sheet.
Creating the Google Apps Script WebApp
Our first task is to receive a notification from our Teachable page via a webhook that a new student has enrolled in our course. We can do this with a Google Apps Script custom doPost() trigger function and building a webapp.
The doPost(e) function allows us to receive information from an external app like our Teachable webhook.
Here is the basic code that will allow us to make sure everything is running successfully:
function doPost(e) { const dataContents = JSON.parse(e.postData.contents); return HtmlService.createHtmlOutput(); }; When we receive our webhook information it will be packaged inside our 'e' or event parameter as a JSON object in the e.postData.contents property. Line 3
Finally, we need to build our frontend environment with the HtmlService class's createHtmlOutput() method. We will leave its parameter blank here. Line 5
The first deployment of the webapp
We need to deploy our webapp now to get its URL.
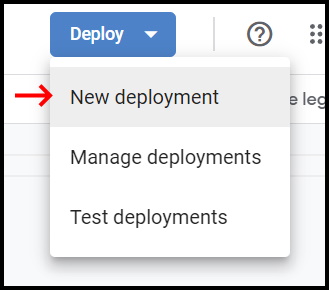
In the top right select the Deploy button.

A dropdown will appear. Select New deployment.
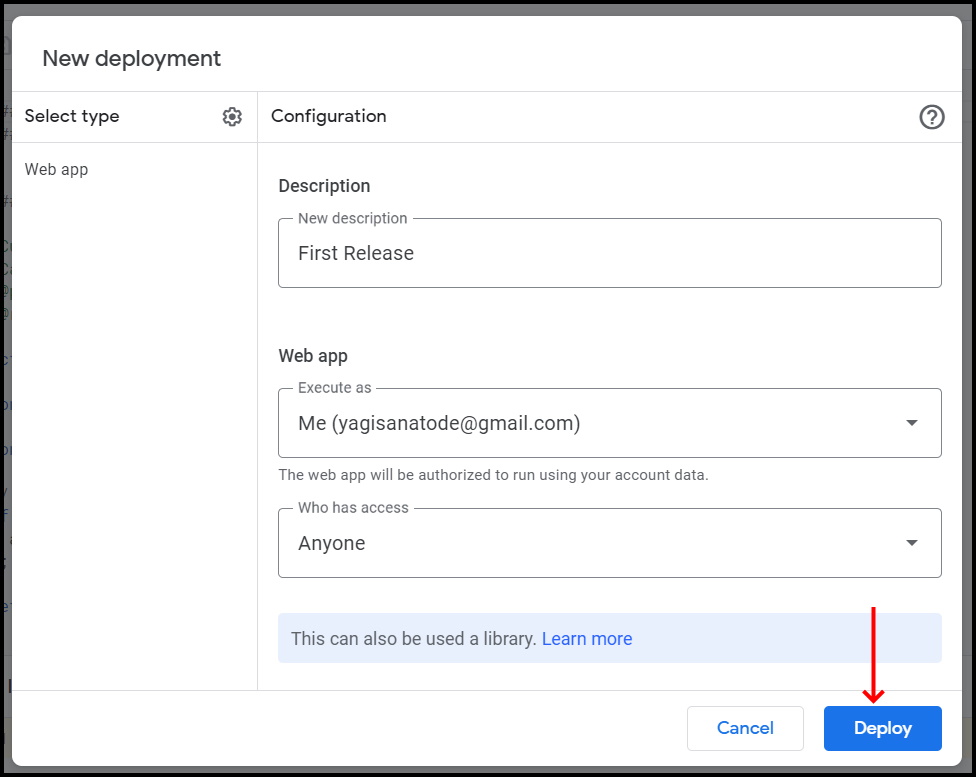
A pop-up window will appear. You shouldn't have to make any changes here. The Description is optional, I usually put in 'First Release' for the first deployment.
'Execute As' should be set to "Me(youremail@gmail.com)".
'Who has access' needs to be "Anyone", because your Teachable account needs to access your webapp.
Select Deploy.
 Another pop-up screen will appear with your webapp URL. Copy the URL and select Done.

Setting up the Teachable webhook
Head over to your Teachable account and log into your school.
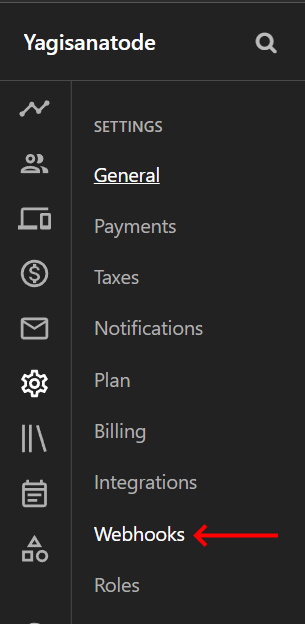
in the sidebar of your Dashboard, select Settings.

Then select Webhooks.
Select New Webhook

Paste in the Google Apps Script webapp that you created.
Then select the New Enrollment.
Finally, click Create Webhook.

That's it. You're all done.
Your webhook will remain in a pending state until a user enrols into your course.

Testing the webhook
Either create a new student or use an existing 'test' student account. Make sure that they are unenrolled from one of your courses.
Go to your Teachable school and select Users > Students.
- Search for your test student.
- Check the box.
- Select Bulk Actions.
- Select Enroll in Course.

Wait a little bit, and then head back to your Google Apps Script editor and navigate to the Executions tab.
You should see that the doPost() function ran and the status was completed.

Note! If your dummy student account is already enrolled in your course you will not receive a webhook. Teachable will not send a webhook action for something that has already occurred. Simply unenroll your dummy student and enrol them again.
What does enrollment JSON look like?
When your test doPost() function ran it would have collected the following information:
dataContents = [ { "type": "Enrollment.created", "id": 12345, "livemode": true, "created": "2016-08-31T16:50:28+00:00", "hook_event_id": 1, "object": { "created_at": "2016-08-31T16:27:34Z", "coupon": null, "user_id": 43434343, "course_id": 444444, "primary_course_id": 444444, "sale_id": 333333, "is_active": true, "enrolled_at": "2016-08-31T16:27:34Z", "percent_complete": 0.0, "has_full_access": false, "id": 22232323, "meta": { "class": "enrollment", "url": null, "name": "222232323", "description": null, "image_url": null }, "user": { "created_at": "2016-08-31T16:27:34Z", "role": "student", "gravatar_url": "https://s.gravatar.com/avatar/947826003b5e9f4b1c08a49231a6995b?d=mm", "email": "test@gmail.com", "notes": null, "affiliate_code": "5559_9r2htpcz", "name": "Kanwar", "is_owner": false, "sign_in_count": 3, "is_student": true, "is_affiliate": false, "is_author": false, "src": null, "current_sign_in_at": "2016-08-31T16:27:35Z", "last_four": null, "paypal_email": "test@gmail.com", "affiliate_revenue_share": null, "joined_at": "2016-08-31T16:27:34Z", "transactions_gross": 0, "signed_up_affiliate_code": null, "author_revenue_share": 0.0, "last_sign_in_ip": "99.224.146.47", "current_sign_in_ip": "99.224.146.47", "id": 2058707, "school_id": 859, "meta": { "class": "user", "url": null, "name": "Kanwar", "description": "test@gmail.com", "image_url": "https://s.gravatar.com/avatar/947826003b5e9f4bfffff1c08a49231a6995b?d=mm\u0026size=100" }, "author_bio_id": null, "total_sales": 0, "author_bio": null }, "course": { "id": 4444444, "name": "Teachable 2015 Summit Replays", "url": "http://academy.teachable.com/courses/teachable-summit-replays" } } } ]; Let's go ahead and build the propper doGet() function.
Completing the doGet() function
// ####### doPost ####### /** * Custom Google Trigger that receives a post from the Teachable Webhook. * Calls addUserToDriveElement() to run function. * @param {Object} e - This is the data that is retrieved from the post to the webapp. * @returns {HtmlService.createHtmlOutput} - Activates the webhook retriever webapp. */ function doPost(e) { const dataContents = JSON.parse(e.postData.contents); const webhookType = (dataContents.type !== undefined) ? dataContents.type : false; // Verify type. if (webhookType == 'Enrollment.created') { addUserToDriveElement(dataContents); }; return HtmlService.createHtmlOutput(); }; Once we have collected our dataContents we want to first make sure that the type property exists. If it doesn't, it is unlikely that it is not a webhook and not one sent from Teachable. I've used a JavaScript Ternary operator to determine if this property exists or not. We'll store this in our webhookType variable. Line 13
Next, we check if the type name is "Enrollment.created". If it is, then we will run our main function addUserToDriveElement() taking the dataContents object as an argument. Lines 16-18
Adding users to the Drive files and folders
We will now set up our main run function to complete our task we will call it addUserToDriveElement(). It takes our dataContents as a parameter here.
Here's the code:
// ####### Add user to drive element ####### /** * Main run function to get shared file urls, attempt to share * files or folders or send request for Google email and updating * the management Google Sheet. * @param {Object} dataContents - Object containing all information from Teachable Webhook on the Enrollment. */ function addUserToDriveElement(dataContents) { const email = dataContents.object.user.email; const studentName = dataContents.object.user.name; const courseID = dataContents.object.course_id; const courseName = dataContents.object.course.name; const ss = SpreadsheetApp.getActiveSpreadsheet(); const dataVals = ss.getRangeByName("ShareData").getValues(); const courseUrls = dataVals.reduce((acc, row) => { if (row[0] == courseID) { acc = acc.concat([row[2]]) }; return acc; }, []); var token = null; const nonGoogleEmail = givePermission(courseUrls, email); // Returns 'true' if email is not a Google Email. if (nonGoogleEmail) { setFormTrigger() token = emailStudent(email, studentName, courseName); }; addStudentToSheet(email, courseID, token); }; Set the variables
Our first task is to extract the student's email, their name, course ID and course name from the dataContent.object object. You can find the path to these properties in the JSON example I shared earlier. Lines 10-13
Get the Shared Locations data
Next, we grab the current spreadsheet with the SpreadsheetApp Google Apps Script class and the getActiveSpreadsheet() method.
Remember earlier when we created our Shared Locations sheet tab that we also created a named range called 'ShareData'. We can conveniently use the getRangeByName() method to get this range. This method takes the named range as an argument and returns the range constructor. From there we can call the getValues() method to grab all the values in each cell. Lines 16-17
Using reduce to extract course URLs
From the values that are retrieved from our 'ShareData' named range, we need to extract all the Google Drive files and folder URLs related to the current course that the new student has enrolled in.
Here we use the JavaScript 'reduce' method. This method allows us to iterate through our 2d array of ShareData and store only the URLs for our course.
For us, this function will take an accumulator parameter to store our results. We will also use the current value argument here to look at each row of data on each iteration. We will also need to set our initial value to an array so we can add our URL as an array. Lines 19-24
reduce((accumulator, currentValue) => { ... if the row course id matches the currently iterated course id then store the URL in the accumulator ... }, initialValue) Giving permission
Next, we will attempt to give permissions to our selected files and folders to our newly enrolled students.
Not every student will have enrolled with a Google-friendly email so we need to send those students an email with an attached form. They fill out the form with a Google-friendly email and send it back to us to automatically share them with the course docs.
Now we don't want just anyone to be able to fill out the form or a 'charitable student to fill the form out multiple times for their mates. So we need to set a unique token for them.
First, we set the token variable to null, for students who have a Google-friendly email. Line 27
Next, we will attempt to share the student with our course files and folders using our givePermission() function which takes the list of courseUrls and the student's email. If the function cannot share the student it will return true. We will store this the nonGoogleEmail variable. Line 28
Now we check if nonGoogleEmail was set to true. If it was, then we need to set a form trigger on our Google Sheet and connected Google Form ( We will create this soon).
Then we will email the student to ask them to provide a Google-friendly email with our emailStudent() function, which will return a unique token for the student. This function takes the students name, email and course name. These will be added to the student's email. Lines 30 - 34
Finally, we need to add our new student to our Google Sheet addStudentToSheet(email, courseID, token). This will add the student to the 'Students' sheet tab along with a date-time stamp.
Now that we have the main function stored out, let's look at the connected functions.
givePermission(urls, email)
This function is called from addUserToDriveElement(dataContents) and has two parameters:
- URLs - an array of Google Drive files and folder URLs connected to the course.
- Email - a string containing the student's email.
The function will return true if the email is a non-Gmail or non-Google Workspace domain email.
// ####### Give Permissions to Students ####### /** * Gives permission to students who have a google email. * @param {array} urls - Array of shared document and folder URLs * @param {string} email - email of the student to be shared. * @returns {boolean} true if non-Google email, false if Google email. */ function givePermission(urls, email) { let nonGoogleUser = false; const permission = { 'type': 'user', 'role': 'reader', 'value': email } urls.forEach(url => { //Get ID from url. //Handles Google Drive Files and folders & apps script. let id = ''; id = url .split(/\/d\/|\/folders\//)[1] .split(/\//, 1)[0] try { Drive.Permissions.insert( permission, id, { sendNotificationEmails: false } ); } catch (e) { // If the error contains the sent email, then it is probably a non-Google Email. if (e.details.message.indexOf(email)) { return nonGoogleUser = true; // For nonGoogleToken variable. }; throw new Error(e); //Some other error we want displayed. }; }); return nonGoogleUser; // For nonGoogleToken variable. }; Setup for non-Google Users
First, we set a nonGoogleUser variable to false. This will only change if the email could not be shared on the files and folders.
Google Drive API permissions payload
Next, set up the permission payload. This will be sent to the files and folders to give permissions.
We are using the Google Drive advance API here rather than the Google Apps Script DriveApp. Why? Because it allows us to share users without sending them an email confirmation to inform them that they are shared. We want the sharing to be seamless and under the hood. So this is the better approach.
First, we need to connect to the Google Drive advanced service. On the right side of your Google Apps Script editor IDE select Services.
A popup dialogue will appear. Scroll through until you find the Drive API. Select it and then click Add.

Now let's add our permissions:
const permission = { 'type': 'user', 'role': 'reader', 'value': email } Yes, weirdly 'value' will equal the email. The role of 'reader' equates to 'view' access here too. Lines 12 - 16
Iterate through the URLs
We now need to iterate through each of our Google Drive files and folders URLs. We will use the JavaScript forEach method to run our execution inside an arrow function.
Converting the URLs to an ID
Unfortunately, the Drive API does not take a URL as an argument so we will have to extract the file and folder IDs from our URLs. We do this on lines 20 - 25.
//Get ID from url. //Handles Google Drive Files and folders & apps script. let id = ''; id = url .split(/\/d\/|\/folders\//)[1] .split(/\//, 1)[0]
First, we set an id variable to an empty string.
Next, we grab the URL of the file or folder stored in our Google Drive.
We will use the JavaScript split() method along with some regular expressions. This methods allows us to separate our string into parts based on a specified divider. For us, our divider with be a set of regular expressions.
In the first split, we want to separate the URL string by either /d/ or /folders/ these are the two primary types of URLs you will find in your Google Drive. For example:
https://docs.google.com/spreadsheets/d/1_wO551p6YASDFEeqziXckFBLHqFpW7rHkjF_uJ-UQBQ/edit#gid=0https://drive.google.com/drive/folders/1CUIsbfcVEE-fjOwYqhXITBsdf3AD3js4
In our regular expression, our backslashes need to be escaped with a forward slash. So to get:
/d/, we use, \/d\//folders/, we use, \/folders\/
We can have our regular expression check for either condition use the pipe 'or' divider |. Which will give us this regular expression:
/\/d\/|\/folders\//
This will split our string into to an array like this:
id = [ "https://docs.google.com/spreadsheets", "1_wO551p6YASDFEeqziXckFBLHqFpW7rHkjF_uJ-UQBQ/edit#gid=0" ] OR id = [ "https://drive.google.com/drive", "1CUIsbfcVEE-fjOwYqhXITBsdf3AD3js4" ]
We only want the array item at [1] here. So we extract that before moving on to our next split.
.split(/\/d\/|\/folders\//)[1]
Now we want to remove any trailing data after the backslash. We do this by searching for the next backslash and splitting it and then grabbing the array item at [0].
.split(/\//, 1)[0]
This will give us our id.
Attempting to give permission to the user
We need to send our request to share the user to the Google Drive API inside a JavaScript try-catch statement. If a non-google email is shared, it will result in an error and we don't want our script to stop.
try { Drive.Permissions.insert( permission, id, { sendNotificationEmails: false } ); } catch (e) { ... } First, we call the Google Drive API Permissions class and then use the insert method to share our students with their permissions. The insert method is going to take 3 arguments:
- permission - the permission payload we created above our loop.
- id - the ID of the file or folder.
- optional query parameter - This we want to NOT sent a notification email.
Resolving non-google friendly emails
If the email is not a Gmail or Google Workspace Domain email then the Drive app request will throw an error. This will be handled by the catch statement.
... catch (e) { // If the error contains the sent email, then it is probably a non-Google Email. if (e.details.message.indexOf(email)) { return nonGoogleUser = true; // For nonGoogleToken variable. }; throw new Error(e); //Some other error we want displayed. }; The catch statement will return an 'e' error event object. This will contain the 'message' property. If the nature of the error is that the email could not be added because it was not a Google-friendly email, the student's email will be reported in the error message. Then we can return our catch statement with nonGoogleUser set to true. Lines 38-41
We also want to make sure that any other errors that occurs are actually caught and stored so we will throw a new error with our 'e' error message.
Finally, we return our nonGoogleUser true or false result back to the main addUserToDriveElement().
Add Student To Sheet
The final task of the main function is to add the student to the 'Students' sheet tab.
addStudentToSheet(email, courseID, token) takes 3 parameters:
- email: the email of the student. Either Google-friendly or otherwise.
- courseID: the ID of the course.
- token: null if the student has a Google-friendly email, otherwise this will be a string containing the token that the student will be sent.
// ####### Add Student To sheet ####### /** * Adds student to managment sheet. * @param {string} email - Student's email. * @param {string} courseID - ID of the course that the student is assigned to. * @param {string|null} token - 'null' if student has Google ID and a token code if they don't. */ function addStudentToSheet(email, courseID, token) { const studentSheet = SpreadsheetApp.getActiveSpreadsheet().getSheetByName('Students'); const locatDts = new Date().toLocaleString() // Format [Timestamp, Email, Course, Non-Google Email, Access Token, Token Submit Date] if (token) { studentSheet.appendRow([locatDts, "", courseID, email, token]) } else { studentSheet.appendRow([locatDts, email, courseID]) } }; First, we need to select the 'Student' Google Sheet tab. Line 9
Next, we will grab your locations date time stamp using the JavaScript new Date constructor. Line 11
If we have a token, then we want to append our row with:
- date timestamp
- nothing here
- course ID
- non-Google friendly email
- student token
If the student doesn't have a token then we append the row with :
- date time stamp
- email
- course ID
That's it for sharing users to selected files and folders. Next, we will look at what to do with students with non-Google emails.
Dealing with non-Google emails
Once we have discovered that the student has a non-Google friendly email we need to send the student an email with a Google Form attached.
Before we get stuck into our code, we need to build our Form.
Connect the form to your Google Sheet Manager
In your Google Sheet Manager go to Tools > Create a new form.

A new window will appear with a Google Form editor. Before we work on our form, head back to your Google Sheets Manager and you will notice a 'Form Response1' sheet tab has been added to your workbook. Rename it to exactly: Access Request.
 We will use this Form Sheet tab name in our code so it needs to be exact.
Creating your Google Form
Create the form
Your form should look like this:
 Set your form title to:
Students Access For Google Drive Course Data
Next, add a short answer field and name it exactly, "Email". We will be referencing this name in our code in a minute.
Make sure this item is set as required.
Also select the vertical ellipsis at the bottom right and select response validation.
Set the short answer response validation to Text > Email.

Next, go back to the three vertical ellipses in the bottom right and select Description. Enter the following description:
Please provide a Gmail or Google Workspace email to access the drive documents for the course.
Now, add another short answer item and call it exactly, Access Token. We will be using this title for the item again in our code so make it exact.
Set the item to Required and the description to:
Your exclusive access token.
Get the form Prefill URL
We want to be able to pre-fill in the student's access token for them in the Google Form. To do this, select the vertical ellipsis in the top right of your form editor and then select Get pre-filled link.

Next, add something like 11111 to your Access Token item and select, Get link. A little popup will appear, select the Copy link button here.
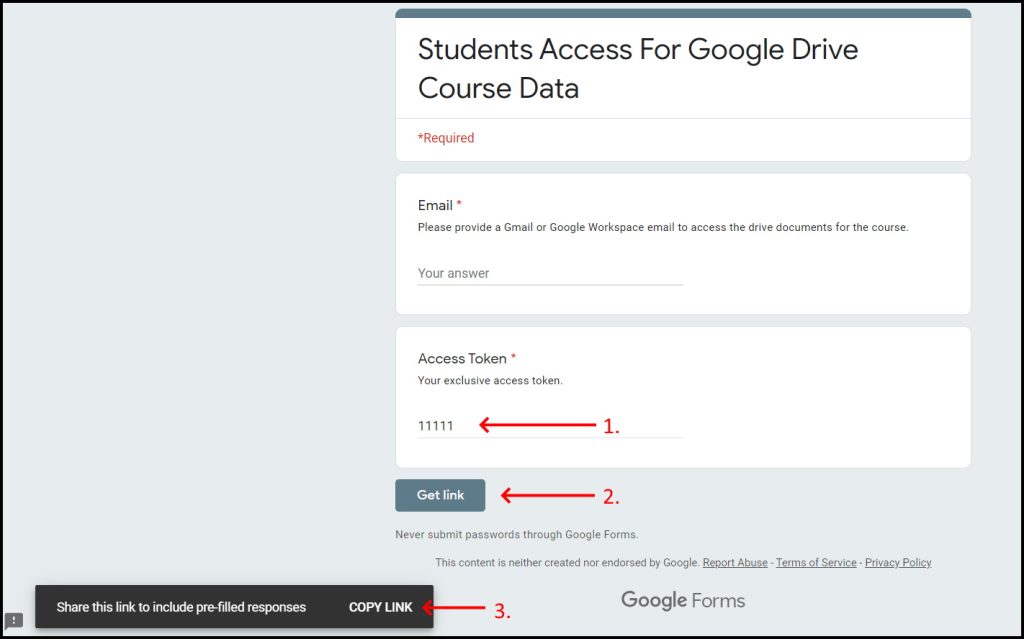
Open up a text editor or something and paste in the URL. You should have something similar to this:
https://docs.google.com/forms/d/e/1FAIpQLSeOY584mfR_WOGt-Nsov2ycTypzrSXeFrlqOzocKK9Vd_HQ4Q/viewform?usp=pp_url&entry.1257072962=11111
Of course, your form ID and entry id will differ from the example above. We will use this URL in a moment.
emailStudent()
// ##################################################### // ########### FORM SETUP FOR NON-GOOGLE EMAIL ######### // ##################################################### // ####### Email Student ####### /** * Non-Google student is sent an emiail with Google Form code. * @param {string} email - Student's email. * @param {string} studentName - Student's name. * @param {string} courseName - Student's course name. * @returns {string} access token number that is store in the sheet. */ function emailStudent(email, studentName, courseName) { const form = getFormURL("Access Request") const token = `${Math.random().toString(36).slice(2)}${Math.random().toString(36).slice(2)}`.toUpperCase() const subject = `Google Drive Access for course: ${courseName}` const html = `<p>Dear ${studentName},</p><p>Thanks for signing up for the course: <b>${courseName}!</b></p> <p> I share a lot of course material in Google Drive and would like to give you exclusive access to these documents.<p/> <p> Unfortunately, I can only share these files with you if you have a gmail account. <p/> <p> Please click the link to the form below: <p> <p><a href="https://yagisanatode.com/2021/11/30/how-to-automatically-share-teachable-students-to-google-drive-files-and-folders-when-they-enroll-in-your-course/${form}?usp=pp_url&entry.1257072962=${token}">Google Drive Access Form</a>,</p> <p> Respectfully,</p> <p> Your course creator </p> ` try { GmailApp.sendEmail(email, subject, '', { htmlBody: html, noReply: true, name: 'AutoReply' }); } catch (e) { throw new Error(`Could not send email: ${email}. Please check the email for errors and try again.`); }; return token; }; When we discover a non-Google URL the main addUserToDriveElement() function call the emailStudent() function. This function takes 3 parameters all as strings:
- email
- studentName
- courseName
Our first task is to get the form with our getFormURL() function which takes the form Sheet tab name "Access Request" as our argument. (More on this function in a moment) Line 15
Create a random-ish token.
Next, we create the unique student token that we will add to our Google Form.
Here I am lazily combining two random alphanumeric strings together to create a random number. Line 16
` ${Math.random().toString(36).slice(2)} ${Math.random().toString(36).slice(2)} `.toUpperCase() Setting up the email data
First, we set up our email subject. Here we use JavaScript template literals to create our string and include the course name at the end of the subject. Line 18
Next, we create the HTML for our email message to our students. First, we will add in the student's name and course programmatically. Line 20
The most important thing to note here is the URL link ot the form. We first reference the form URL from our form variable we generated above. Next, we need to go to where we stored our prefill URL and copy this portion of it:
https://docs.google.com/forms/d/e/1FAIpQLSeOY584mfR_WOGt-Nsov2ycTypzrSXeFrlqOzocKK9Vd_HQ4Q/viewform?usp=pp_url&entry.1257072962=11111
?usp=pp_url&entry.1257072962=
Note that your entry number will change. So make sure you use your own number here.
Also, if you do wish to make a copy of this for another project, then the entry number won't change thankfully.
Emailing the Student
Finally, we need to email the student. We will use a try-catch statement again just in case there is a weird email, but it should be okay if Teachable accepted it.
try { GmailApp.sendEmail(email, subject, '', { htmlBody: html, noReply: true, name: 'AutoReply' }); } catch (e) { throw new Error(`Could not send email: ${email}. Please check the email for errors and try again.`); }; To send our email we make use of the sendEmail() method of the Google Apps Script GmailApp class.
The sendEmail() method takes the following parameters:
- email
- subject
- body
- options
We don't put anything in the body because we want to use the htmlBody property of the options parameter.
Also, in our optional parameters, we can set noReply to true so that the user doesn't try to reply to the email and also we can set the senders name to 'Auto Reply' to make it all cool and official.
If there is an error with sending the email we throw a custom error in the catch block. So we do this at the end.
Finally, we return the token back to addUserToDriveElement().
getFormURL(sheetName)
This function is called from the emailStudent() function. It takes the sheet name of the Google Form sheet tab in the Google Sheets Manager. This should be, 'Access Request'.
The published form URL is returned.
The reason we use this approach ass opposed to hard coding in the Form URL is that we might want to make a copy of our Google Sheets Manager and attached form and that means the Google Form URL will change.
// ####### Get Form URL ####### /** * Gets the attached Google Form URL * @param {string} sheetName - Google Sheet name of the form. * @returns {string} the published url of the form. */ function getFormURL(sheetName) { const ss = SpreadsheetApp.getActive() let formURL = ss.getSheetByName(sheetName).getFormUrl() const publishedURL = FormApp.openByUrl(formURL).getPublishedUrl() return (publishedURL) }; First, we grab our active Spreadsheet and then get the form sheet by name and its associated form URL. Lines 8-9
We use this form URL in the Google Apps Script FormApp class with the openByUrl() method. Next, we grab the published URL with the getPublishedUrl() method.
This is all returned back to the emailStudent() function.
setFormTrigger()
Back in the main addUserToDriveElement() function we call the setFormTrigger() if a user does not have a Google-friendly account.
We only want to set this trigger once and only if we have a user in our school who has enrolled with a non-Google friendly email.
// ####### Set Form Trigger ####### /** * Sets a trigger for and form input to run myFunction when * submitted. * Trigger is not built if already has been built. */ function setFormTrigger() { const propServ = PropertiesService.getScriptProperties(); const hasTrigger = propServ.getProperty('hasTrigger'); if (!hasTrigger) { // Set trigger. ScriptApp.newTrigger('tokenSubmit') .forSpreadsheet(SpreadsheetApp.getActive()) .onFormSubmit() .create() propServ.setProperty('hasTrigger', true); SpreadsheetApp.getActive().toast('Form Trigger built.') } else { SpreadsheetApp.getActive().toast('Form Trigger built previously.') }; }; We will store a property called, 'hasTrigger' in our Google Apps Script Properties Service. Our first task is to check if there is a property by this name and if it has been set to true. If there is no such property, it will be set to null. Lines 8-9
If there is no such property, then we want to create a trigger. Line 12
To do this we use the Google Apps Script ScriptApp class' trigger builder. First, we set the newTrigger to call the function 'tokenSubmit'. Then we will specify that it is for the current active spreadsheet and set the rule that the trigger should occur when a form response is submitted to the Google Sheet. Lines 14-17
Then we will set our Properties Service 'hasTrigger' property to true for next time.
tokenSubmit(e)
When a student resubmits their Google-friendly email we need to first verify that there is a matching token in our 'Students' sheet. If there is, we need to share them on their course files and folders and add them to our 'Students' list.
The tokenSubmit(e) function is triggered when a student submits their form with their Google-friendly email. The onFormSubmit trigger carries an Object with the student's Google Form input information as a parameter.
I've left an example in the code for you to see how it will look.
// ####### Form Token / Email Submission ####### /** * Run when a Google Form is sent to the attached Sheet. * Attempts to share previously, non-Google email user with * their updated email. * @param {Object} e - Form object containing the new email. * @param {Object} e.namedValues - Values from the form. * @param {Array} e.namedValues.TimeStamp - Timestamp * @param {Array} e.namedValues.Email - User's new email * @param {Array} e.namedValues[Access Token] - Access token. */ function tokenSubmit(e) { // namedValues: // { Timestamp: [ '07/11/2021 08:45:46' ], // Email: [ 'email@gmail.com' ], // 'Access Token': [ '1111111' ] } const values = e.namedValues; // Find email and compare token. const ss = SpreadsheetApp.getActiveSpreadsheet(); const sheet = ss.getSheetByName("Students"); // Col D is the non-Google Email, Col E is access token const getUsers = sheet.getRange("A3:F").getValues(); let rowNum = 3; const matchRow = getUsers.find((row, idx) => { // If access token value matches an not already submitted. if (row[4] == values['Access Token'] && row[5].length == 0) { rowNum += idx; row[1] = values.Email[0]; row[5] = values.Timestamp[0]; return row; } }) if (matchRow) { //Get urls const dataVals = ss.getRangeByName("ShareData").getValues(); const courseUrls = dataVals.reduce((acc, row) => { if (row[0] == matchRow[2]) { acc = acc.concat([row[2]]) }; return acc; }, []); givePermission(courseUrls, values.Email[0]) sheet.getRange(`A${rowNum}:F${rowNum}`).setValues([matchRow]); }; }; First, we grab an object of names values that should look like this (Line 17):
{ Timestamp: [ '07/11/2021 08:45:46' ], Email: [ 'email@gmail.com' ], 'Access Token': [ '1111111' ] } Next, we need to grab the range from Col A through to F of our Students sheet tab and grab the values as a 2d array. Lines 20-25
We will set a row number to the first email row under our header. We will use this to find the actual row in the Sheet where our corresponding user will be. Line 27
Find the corresponding row to the token
Next, we will use the JavaScript Find method to determine where the token is in the array if it exists.
 This function will iterate through our 2d array trying to find the row that contains our matching access token and ensure it already has not been filled in.
Find takes a row parameter and can take an optional indexing parameter.
const matchRow = getUsers.find((row, idx) => { // If access token value matches an not already submitted. if (row[4] == values['Access Token'] && row[5].length == 0) { rowNum += idx; row[1] = values.Email[0]; row[5] = values.Timestamp[0]; return row; } }) If row 4 (Column E) matches our Access Token from our form and row 5 (Column F - Token Submit Data) is empty then we will update the rowNum and add the new email to Column B and the current Timestamp to Column F.
Sharing the student with the course
If a matchRow exists we want to share the student with the course and record their new email.
We used the same JavaScript reduce method we used in our main run function (Yeah yeah, refactor it, Yagi!).
Then we send the results to the givePermission() function.
Finally, we get the range of the current student in our 'Students' sheet tab and update the row. Line 54
Redeploying your Webapp
You now need to go back and redeploy your script for it to work with your Teachable webhook.
Before you do give your script a run. Maybe try and run the doGet() function. It will come up with an error, but it will also go through authorising all of your scopes.
Next, click the Deploy button on the top right of your Google Apps Script editor. Select, Manager Deployments.

Select the pencil icon to edit the deployment.
Then change the version to New version.
Finally, select Deploy.
You are all done!
Conclusion
That's it you made it through. How did you go? Any errors you had to work through?
If you are looking for a full copy of the code and the connected Sheet and Slide, to simply copy and paste in and run, plus a heap of extra bonus content you can sign up to the corresponding teachable course for a measly $2.95. Yep, less than the price of a cuppa and you would really help me out to keep this site running and making great content for you.
OR...
I hope you found this tutorial helpful and you have been able to implement it in your own Teachable site. I would love to hear what site you used it on in the comments. Plus it is a bit of promotion for your own course!
~Yagi


No comments:
Post a Comment
Note: Only a member of this blog may post a comment.